Reduxi & M-Tec GEN 3 Energy Butler Hybrid: Save up to 70% on costs thanks to Modbus TCP/IP integration
1. Necessary steps to establish communication between the Reduxi controller and the M-Tec Energy Butler GEN 3
1.1 Install the Latest firmware
With the latest firmware, the Modbus connection is automatically enabled. To perform the update, please contact M-Tec customer service: https://www.mtec-systems.com/serviceanfragen/
1.2 LAN Modul
The LAN module is included as standard in the delivery of the Energy Butler. It must be connected to COM 1 on the inverter.
Below is a diagram of the module:
2. Pysical connection
A symbolic picture of the entire connection from the Reduxi controller to the Inverter is displayed below:
3. Set IP Adress for the M-Tec Energy Butler GEN 3
3.1 Display and menu button
The IP address settings are configured locally on the inverter's display.
To do so, proceed as follows:
Important: If the parameter is a number, briefly press it to change the number, and hold it down to confirm the number and move to the next number.
Please wait 10 seconds and the inverter will automatically save your settings or changes.
3.2 Menu navigation
First, press the button once to activate the display. When "General Settings" appears, press the button for about 3 seconds to enter the submenu.
Then press the button repeatedly until the DHCP Set menu appears. DHCP On should be displayed by default.
Press and hold the button for about 3 seconds. DHCP On should now change to OFF.
Then briefly press the button to change the IP settings. Set the desired address for the Energy Butler GEN 3 here, matching your home network. Change the values with a short press; confirm your entry with a press of the button for longer than 3 seconds.
Repeat this process to set the gateway address and subnet mask.
When you have finished the settings, write down the values and wait about 10 seconds until the WR saves the settings and returns to the main menu.
Then proceed to the next step.
4. Add M-Tec Energy Butler GEN 3 to the Reduxi system
After connecting the Reduxi and the M-Tec Energy Butler, you can register it as a new device (M-Tec Energy Butler).
4.1 Add device (M-Tec Energy Butler GEN 3)
First, log-in to the local Reduxi configurator and add a new device by clicking the 'Add device' button.
4.2 Select M-Tec Energy Butler GEN 3
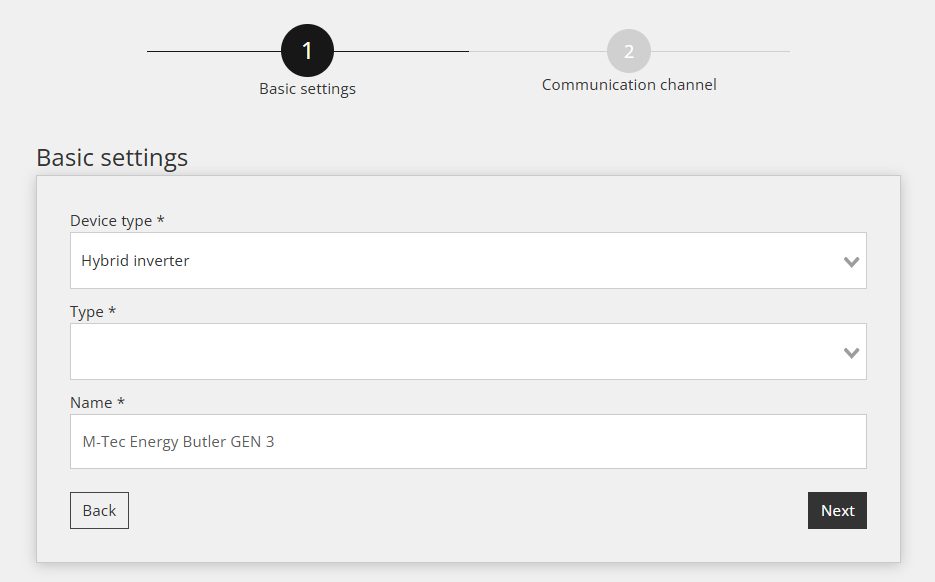
Within the first step, basic settings are defined:
- Select Device type: Hybrid Inverter,
- Select Type: M-Tec Energy Butler GEN 3,
- Name the device as you wish as an example: M-Tec Energy Butler GEN 3
4.3 Device Configuration for Communication Channel
The second step involves configuring the communication channel, which is essential for proper Modbus TCP/IP communication. In this step, the communication link between the Reduxi controller and the M-Tec Energy Butler GEN 3 Inverter is established.
Settings for the Communication channel are displayed below:
- Connection: TCP/IP
- IP: Enter the IP address of the M-Tec Energy Butler GEN 3
- Port: 502
- Modbus unit ID: 255 is the default value of M-Tec
4.4 Test communication
Below all fields of the Communication channel mentioned in the previous step, there is a "Test Communication" button.
This button is used to verify whether the Modbus TCP/IP connection between the devices is functioning correctly.
Successful response (example):
Unsuccessful response (example):
4.5 Readings from Device
This section shows you how to check the device's measured values and whether it is communicating correctly. This can be done under "Devices/ (M-Tec Energy Butler GEN 3)/Last Measurement."
For advanced M-Tec Energy Butler GEN 3 control, integrate the device into the Optimization modes of the Reduxi system. Under Devices/ M-Tec Energie Butler GEN 3 in the Reduxi configurator, the control type must be set to AUTO so that commands for strategy will affect the battery.
To achieve maximal flexibility and energy cost reduction with respect to dynamic price and dynamic tariffs, please follow the instructions on how to define strategy at this link: Strategies for Reduxi controller.
After successfully adding the device, it can be monitored and controlled via the Reduxi application.